本文介绍了特殊格式log日志生成自定义报告方法
如果在日常工作中,遇到一堆数据,但是想实现自动化将数据生成报告或者统计报表,这时候就需要掌握一些定制化输出报告的技能了;
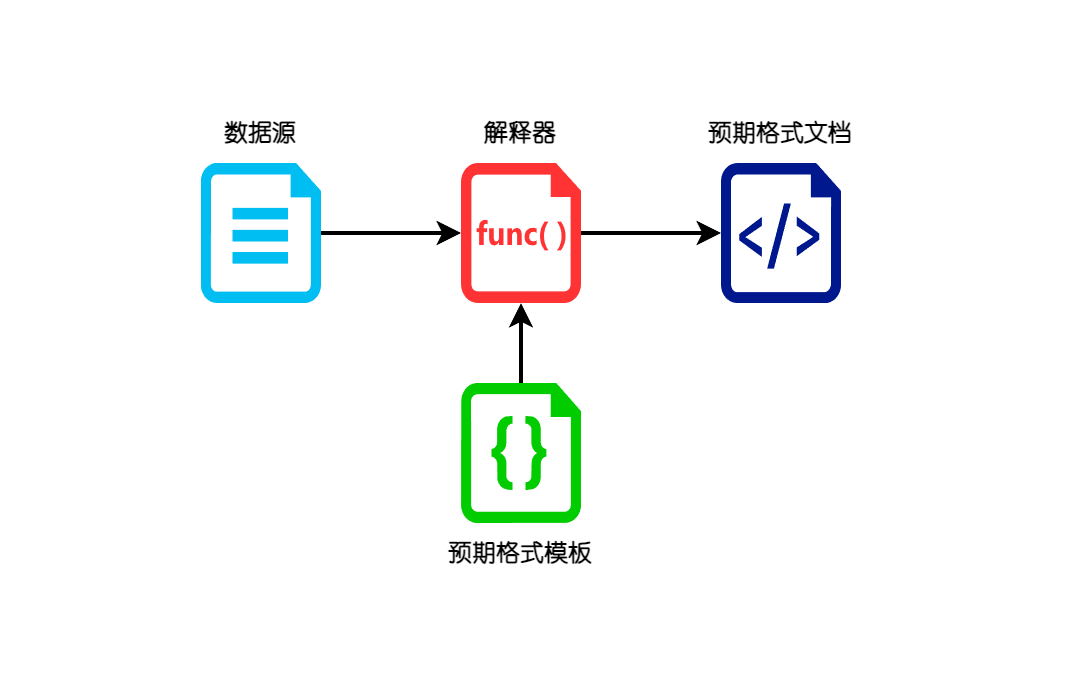
模板文件: 对于特定格式的报告输出,首先我们需要准备一个模板文件,在这个模板文件中,需要数据的内容用变量表示,而其他与数据无关的内容则事先编辑好(主题、外观、排版等);数据文件: 数据文件就是我们的数据来源,可以是txt文本流,可以是csv或者excel表格文件,或者其他常规数据文件;解析器: 解析器其实就是程序或者脚本,解析器的作用是将数据文件提取转换成特定的格式,这个特定的格式是模板文件所需要注入的;
定制化报表/报告的输出流程如下:
本文所介绍的是通用的方法,可以作为其他自动化报表输出的思路参考,本文中实际使用的工程代码以及测试文件将分享在gitee上;源码
Python 基本语法与基本应用
Mako文档阅读,了解Mako的语法和基本用法
在Python环境下,安装和Mako库
以在板单元测试的输出日志为例:
以数字开头表示测试用例下测试步骤对应的信息,如:
前缀
分隔符
步骤号
时间戳
调用的API
描述
结果
尾缀
UNIT
:
数字
浮点
spi_flash_chip_id
Read chip id is c84018
pass/fail
\r\n
信息之间用逗号分隔符分隔,如:
前缀
分隔符
前缀
测试用例名称
尾缀
UNIT
:
BEGIN
ABCDEF
\r\n
表明测试用例开始执行
前缀
分隔符
前缀
测试用例名称
尾缀
UNIT
:
END
ABCDEF
\r\n
表明测试用例执行完毕
测试日志输出 unit_test 20241204 150444.txt
1
2
3
4
5
6
7
8
9
10
11
12
13
14
15
16
17
UNIT:BEGIN|FatFs Driver Test INFO:>> Flash has no filesystem yet, formatting... << INFO:>> Flash already formatted. << UNIT:0|0.719|app_fatfs_mount|fatfs can be mounted successfully|pass UNIT:1|0.729|f_open|create a new txt file|pass UNIT:1|0.785|f_write|write context to txt file|pass UNIT:1|0.936|f_close|close txt file|pass UNIT:2|0.938|f_open|open a exist txt file|pass UNIT:2|0.940|f_size|check file size 33|pass UNIT:2|0.948|f_read|read context from opened file|pass UNIT:2|0.950|f_close|close a opened file|pass UNIT:3|0.952|-|check read content is write content|fail INFO:test__Fatfs_Driver <!!!> failed: E:/MyWorkLog/MainLine2/Tools/12_PicoThermocouple/03_Embeddedsoftware/PicoTempratureMeter/unit/minunit-test-list.c:240:equal_r == FALSE UNIT:4|0.961|app_fatfs_unmount|fatfs can be unmounted successfully|pass UNIT:END|FatFs Driver Test INFO:2 tests, 20 assertions, 1 failures INFO:Finished in 0.967 seconds
模板文件可以从网上淘一个自己的喜欢的,当然,如果熟悉html也可以自己写一个;这里借用了别家html的报告稍加修改,效果大概是这样的。
这个报告的标准输出模板主体为5列表格,每一行代表了实际的测试流程项,由此我们可以用json格式先表示测试项这样的数据,以方便我们后续的代码实现:
1
2
3
4
5
6
7
{ "index" : "0" , "time_stamp" : "0.719" , "api" : "app_fatfs_mount" , "description" : "fatfs can be mounted successfully" "result" : "pass" }
一个测试用例携带了用例信息,如样例所示,包含了测试开始时间、结束时间,测试用例标题等,一个测试用例会绑定测试步骤列表:
1
2
3
4
5
6
7
8
9
10
11
12
13
14
15
16
17
18
19
20
21
22
{ "index" : "2" , "title" : "Fatfs Driver Test" , "begin_time" : "2024-12-04 15:04:44" , "end_time" : "2024-12-04 15:04:44" , "result" : "pass" , "steps" : [ { "index" : "0" , "time_stamp" : "0.719" , "api" : "app_fatfs_mount" , "description" : "fatfs can be mounted successfully" "result" : "pass" } , { "index" : "1" , "time_stamp" : "0.729" , "api" : "f_open" , "description" : "create a new txt file" "result" : "pass" } , ] }
多个测试用例的信息即是上述结构以列表(数组)形式嵌套表述;
Python代码要实现的功能就是第二节约定的txt日志字符流文件按照特定格式解析,保存在字典数组嵌套数据里(第三节内容):
使用Python的话只需要少量的代码就可以实现解析,如上面的样例,打开txt文件,采用行读取的方式:
一次性读取所有行
逐行进行字符”:“分割,逃过前缀非”UNIT“的行
前缀为”UNIT“的行中,对后段进行字符”|“分割
"|"分割后的数据长度是固定的,如果长度是2,则表示测试用例的起始和结束;如果长度是5,则表示测试用例的测试流程信息
如果当前行是测试用例的起始,通过”BEGIN“判断,新建测试用例数据对象
如果当前行是测试流程信息,追加测试步骤信息
如果当前行是测试用例结束,通过”END“判断,追加测试用例下的完整测试步骤信息,随后将当前测试用例追加到用例列表
代码如下:
1
2
3
4
5
6
7
8
9
10
11
12
13
14
15
16
17
18
19
20
21
22
23
test_case_detail = {} test_case_step_detail = [] with open (self .path + "/" + item,'r' , encoding='UTF-8' ) as f: self .log_lines = f.readlines() for line in self .log_lines: line_items = line.split(':' ) if line_items[0 ].find("UNIT" ) != -1 : line_infos = line_items[1 ].split('|' ) if len (line_infos) == 5 : test_case_step_detail.append({"index" : line_infos[0 ], "time_stamp" : line_infos[1 ], "api" : line_infos[2 ], "description" : line_infos[3 ], "result" : line_infos[4 ]}) if line_infos[4 ].find("fail" ) != -1 : test_case_detail["result" ] = False else : if line_infos[0 ].find("END" ) != -1 : test_case_detail["steps" ] = test_case_step_detail test_case_detail["begin_time_stamp" ] = test_case_step_detail[0 ]["time_stamp" ] test_case_detail["end_time_stamp" ] = test_case_step_detail[-1 ]["time_stamp" ] test_cases.append(test_case_detail) if line_infos[0 ].find("BEGIN" ) != -1 : num_of_all_case += 1 test_case_detail = {"index" : num_of_all_case, "title" : line_infos[1 ], "description" : line_infos[1 ], "result" : True , "begin_time" : test_time, "end_time" : test_time} test_case_step_detail = []
我们以实际输出的report.html为模板,复制重命名为template.html,找到测试步骤对应的的内容:
1
2
3
4
5
6
7
8
9
... <tr > <td class ="DefineCell" > 0.719</td > <td class ="NumberCell" > 0</td > <td class ="DefaultCell" > app_fatfs_mount</td > <td class ="DefaultCell" > fatfs can be mounted successfully</td > <td class =PositiveResultCell > pass</td > </tr > ...
在上面对应块的地方实现Mako的渲染脚本:
1
2
3
4
5
6
7
8
9
10
11
12
13
14
15
16
17
% for step in item["steps"]: <% resCellClass = "DefaultCell" if step["result"] == "fail\n": resCellClass = "NegativeResultCell" elif step["result"] == "pass\n": resCellClass = "PositiveResultCell" endif %> <tr > <td class ="DefineCell" > ${step["time_stamp"]}</td > <td class ="NumberCell" > ${step["index"]}</td > <td class ="DefaultCell" > ${step["api"]}</td > <td class ="DefaultCell" > ${step["description"]}</td > <td class =${resCellClass} > ${step["result"]}</td > </tr > % endfor
不难发现,模板的意义就是替换掉要显示的数据内容,加以循环控制和逻辑判断;模板里的的变量,就是数据结构中的对应的内容;
使用Mako库渲染输出报告,下面为示例代码:
1
2
3
4
5
6
7
8
9
10
11
12
13
14
15
16
17
import osfrom mako.template import Templatefrom mako.runtime import Contextfrom io import StringIO... mytemplate = Template(filename='./template.html' ) buf = StringIO() ctx = Context(buf, **self .test_case_detail) mytemplate.render_context(ctx) with open ("report.html" ,'w' , encoding='UTF-8' , newline="" ) as f: f.write(buf.getvalue()) ...
报告完整的效果是这样的: